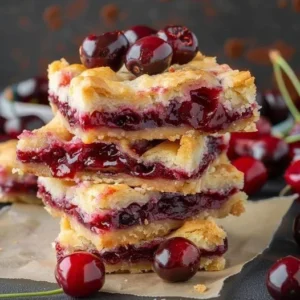
Homemade Cherry Pie Bars Recipe
If you love the sweet, tangy taste of cherry pie but are looking for a more portable version, cherry pie bars are the answer. These bars capture the same delicious flavors of a traditional cherry pie, with a buttery, crumbly crust, a fruity filling, and a simple glaze to finish it off. They’re perfect for a quick dessert, a bake sale, or just as a sweet treat after dinner.
Here’s how to make homemade cherry pie bars from scratch!
Ingredients
For the crust:
- 2 1/2 cups all-purpose flour
- 1 cup unsalted butter, softened
- 3/4 cup granulated sugar
- 1/4 teaspoon salt
- 1 teaspoon vanilla extract
- 1 egg, beaten (for brushing)
For the cherry filling:
- 2 cans (14.1 oz each) of sweetened cherry pie filling (or 4 cups homemade cherry filling)
- 2 tablespoons cornstarch (if making homemade filling)
- 1 tablespoon lemon juice
- 1/2 teaspoon almond extract (optional, but adds a nice depth of flavor)
For the glaze (optional):
- 1/2 cup powdered sugar
- 1 tablespoon milk
- 1/2 teaspoon vanilla extract
Instructions
Step 1: Prepare the Crust
- Preheat the Oven: Begin by preheating your oven to 350°F (175°C). Line a 9×13-inch baking pan with parchment paper or lightly grease it to prevent sticking.
- Mix the Crust Ingredients: In a large mixing bowl, combine the flour, sugar, and salt. Add the softened butter and mix until you achieve a crumbly texture. You can do this by hand using a pastry cutter or use an electric mixer on low speed. Add the vanilla extract and mix until just combined. The dough will be soft and slightly crumbly, which is ideal.
- Press the Dough into the Pan: Take about two-thirds of the dough and press it evenly into the bottom of the prepared pan. This will form your crust. Use your fingers or a spatula to press it down firmly, making sure the dough is distributed evenly across the base.
- Bake the Bottom Crust: Bake the crust for 15-20 minutes, or until the edges are lightly golden. Once baked, remove it from the oven and let it cool while you prepare the cherry filling.
Step 2: Make the Cherry Filling
While the crust is baking, it’s the perfect time to prepare the cherry filling.
- Prepare the Cherry Filling (if using homemade): If you’re using canned cherry pie filling, you can skip this step. However, if you want to make homemade cherry filling, start by placing 4 cups of fresh or frozen cherries in a saucepan over medium heat. Add 2 tablespoons of cornstarch, 1 tablespoon of lemon juice, and 1/2 teaspoon of almond extract. Stir the mixture gently as it heats up. Once the cherries have softened and released their juices, cook the mixture for 5-7 minutes until it thickens. Let it cool slightly.
- Use the Canned Cherry Pie Filling: If using store-bought cherry pie filling, you can simply open the cans and set the filling aside to use later.
Step 3: Assemble the Cherry Pie Bars
- Spread the Cherry Filling: Once the crust has cooled for a few minutes, spread the cherry pie filling evenly over the baked crust. Be sure to distribute the cherries and their juices well so that the entire surface is covered.
- Top with Crust Crumbles: Take the remaining dough and crumble it over the top of the cherry filling. It doesn’t need to cover it completely—some gaps are fine, as the crust will bake up golden and crisp in these spots.
Step 4: Bake the Cherry Pie Bars
- Bake the Bars: Place the pan back into the oven and bake for 40-45 minutes, or until the top is golden brown and the filling is bubbling up from underneath the crust. You may want to check it around the 30-minute mark to ensure the crust isn’t browning too quickly. If it’s getting too dark, lightly cover the bars with aluminum foil for the remaining baking time.
- Cool and Slice: Once the bars are done baking, remove them from the oven and allow them to cool completely in the pan. This will ensure the filling sets and makes it easier to cut into clean bars. Cooling takes about 1 to 2 hours at room temperature. You can also place the pan in the refrigerator to speed up the process.
Step 5: Add the Glaze (Optional)
For an extra touch of sweetness, you can drizzle a simple glaze over the cooled bars.
- Make the Glaze: In a small bowl, whisk together powdered sugar, milk, and vanilla extract until smooth. If the glaze is too thick, add a bit more milk to reach a pourable consistency.
- Drizzle the Glaze: Once the bars are completely cool, drizzle the glaze over the top using a spoon or a piping bag for a more controlled drizzle.
Step 6: Serve and Enjoy!
Once the glaze has set, cut the cherry pie bars into squares or rectangles, depending on your preference. These bars are perfect for serving at parties, picnics, or just enjoying with a cup of coffee or tea.
Tips for the Best Cherry Pie Bars:
- Use a mix of tart and sweet cherries: For a more complex flavor, mix sweet and tart cherries together when making your own filling.
- Add some spices: A sprinkle of cinnamon, nutmeg, or even a little clove can add warmth and depth to the filling.
- Use a food processor for the crust: If you want a super flaky, uniform crust, consider using a food processor to blend the dough ingredients quickly.
- Chill the dough: If the dough feels too soft to handle, you can chill it for 30 minutes in the fridge to make it easier to press into the pan.
Conclusion
These homemade cherry pie bars are an easy, delicious dessert that brings the flavors of a traditional cherry pie into a more convenient and portable form. With a buttery crust, juicy cherry filling, and a light glaze, they are sure to become a favorite at any gathering. Whether you’re baking for a special occasion or just craving a sweet treat, this recipe will hit the spot every time. Happy baking!